Getting Started
Prerequisites
- JDK >= 17. You can download the OpenJDK here
- Apache Maven >= 3.8.5, preferably the latest version available here.
This documentation assumes you have decent knowledge of the Java programming language. Being familiar with Discord4J and reactive programming is not required, although recommended. The Discord4J documentation provides great guides to get started with reactive programming and advanced Java features.
From the Maven archetype
The recommended way to start a project with Botrino is to use the Maven archetype (replace [VERSION] with the latest
version
available):

mvn archetype:generate -DarchetypeGroupId=com.alex1304.botrino -DarchetypeArtifactId=botrino-archetype -DarchetypeVersion=[VERSION]
You will be asked to enter the groupId, the artifactId, the version and the package of your project. If
successful, it should generate a project with the following contents:
myproject
├── app
│   ├── pom.xml
│   └── src
│       └── main
│           ├── external-resources
│           │   ├── config.json
│           │   ├── launcher.cmd
│           │   └── logback.xml
│           ├── java
│           │   ├── com
│           │   │   └── example
│           │   │       └── myproject
│           │   │           ├── Main.java
│           │   │           ├── PingCommand.java
│           │   │           ├── SampleService.java
│           │   │           └── Strings.java
│           │   └── module-info.java
│           └── resources
│               └── AppStrings.properties
├── delivery
│   └── pom.xml
├── launcher
│   ├── pom.xml
│   └── src
│       └── main
│           └── java
│               ├── com
│               │   └── example
│               │       └── myproject
│               │           └── Launcher.java
│               └── module-info.java
└── pom.xml
- The
app/directory corresponds to the main module of your bot application. It already contains pre-generated classes with a main method, an example command and an example service. It also shows how to externalize strings via a.propertiesfiles in the root ofsrc/main/resources, and a classStringscontaining constants to reference them. Thesrc/main/external-resourcesdirectory contains the configuration files necessary to run the bot. - The
delivery/directory only contains apom.xmlthat is capable of generating a runtime image of the bot application using thejlinkutility, bundled with the JDK 17. - The
launcherdirectory contains the module used bydeliveryto create a basic launcher for the runtime image. - The
pom.xmlwhich configures the project by importing the libraries and configuring the multi-module build.
The archetype will automatically include the interaction library in your project dependencies.
This project is ready to be opened in your favorite IDE (Eclipse, IntelliJ...), and you can directly jump to the Running your bot section.
From a blank project
If you don't want the JLink runtime image, or if you want to use a build tool other than Maven, you may as well start from a blank project and import Botrino yourself. Be aware that it will require a bit more effort to set up than using the archetype.
Import the following dependency:
- Maven
- Gradle
<dependency>
    <groupId>com.alex1304.botrino</groupId>
    <artifactId>botrino-api</artifactId>
    <version>[VERSION]</version>
</dependency>
repositories {
    mavenCentral()
}

dependencies {
    implementation 'com.alex1304.botrino:botrino-api:[VERSION]'
}
As usual, replace [VERSION] with the latest version
available:
Create a module-info.java annotated with @BotModule, with the open modifier and that requires the botrino.api
module:
import botrino.api.annotation.BotModule;

@BotModule
open module com.example.myproject {

    requires botrino.api;
}
The module transitively requires all libraries necessary to work, including Discord4J, Reactor, Netty, RDI and Jackson,
so you don't need to put requires for those libraries.
If you get compilation errors, remember to configure your project to use JDK 17 or above.
Finally, add a class with a main method:
package com.example.myproject;

import botrino.api.Botrino;

public final class Main {

    public static void main(String[] args) {
        Botrino.run(args);
    }
}
If you want to include the interaction library in your project, refer to this page.
Running your bot
During development
When you are developing your bot, you may prefer running the bot directly in your IDE rather than package your application every time.
If you used the archetype, copy the contents of app/src/main/external-resources in a new directory on your hard drive,
outside of the project workspace. If you aren't using the archetype, create a directory outside of your project and
add a config.json file with the following contents (insert your bot token in the "token" field, and remove
the "interaction" field if you aren't using the interaction library):
{
    "bot": {
        "token": "yourTokenHere",
        "presence": {
            "status": "online",
            "activity_type": "playing",
            "activity_text": "Hello world!"
        },
        "enabled_intents": 32509
    },
    "interaction": {}
}
Use the tabs below depending on whether you use Eclipse or IntelliJ. If you use another IDE, it should be similar enough so you can figure out by yourself.
- IntelliJ
- Eclipse
-
Open
Run>Edit Configurations... -
If you are using the archetype, it should detect a run configuration called "Main" automatically. If so, jump to step 7, otherwise continue
-
Click
+thenApplication -
Select Java 17 (or whatever JDK 17+ you have installed)
-
In the "Main class" field, enter the fully qualified name of the class containing the main method
-
In the "VM options" field, copy and paste the following:
--add-modules=ALL-MODULE-PATH -cp . -p $MODULE_DIR$/target/dependency:$MODULE_DIR$/target/classes -
In the "Working directory" field, enter the absolute path (or click the folder icon to browse) to the directory where you copied/created the configuration files earlier
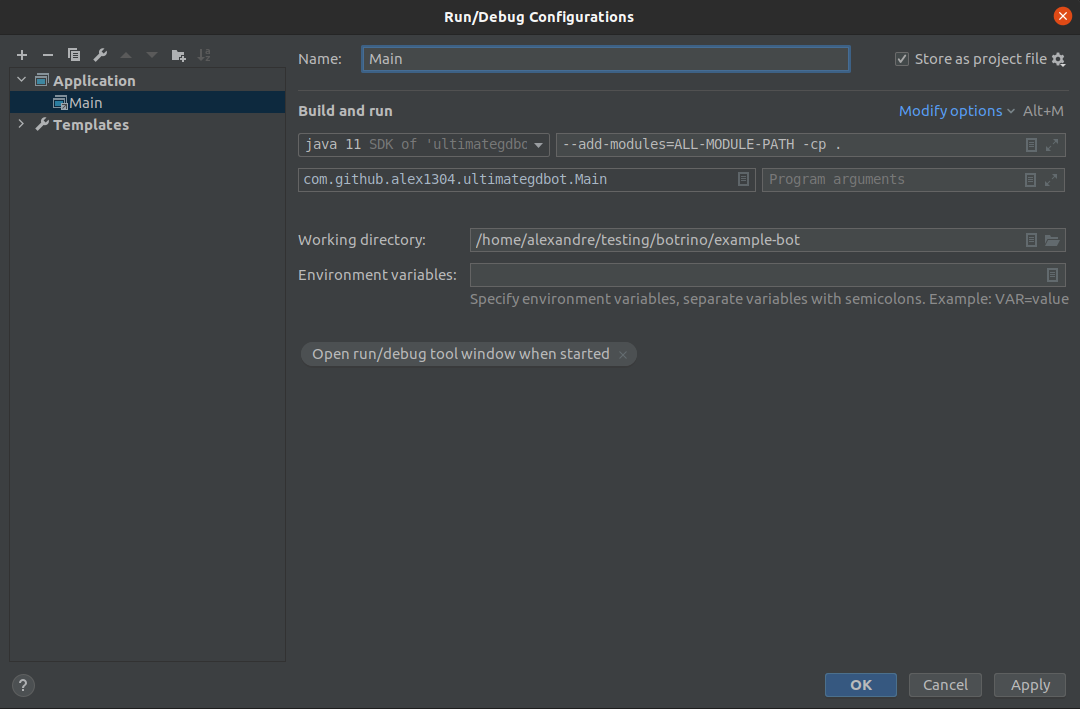
- Click "OK" and run
-
Open
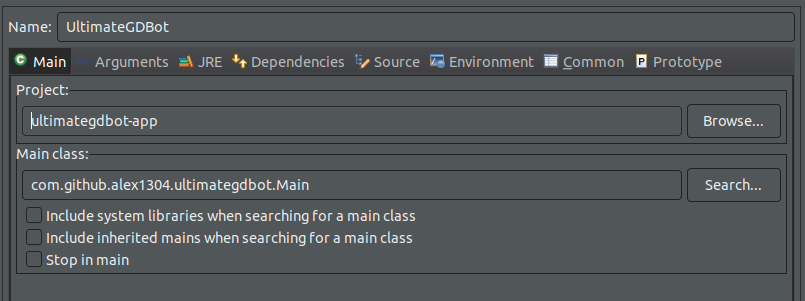
Run>Run Configurations... -
Right click
Java Applicationthen clickNew Configuration -
In the "Project" field, select your project containing the main class
-
In the "Main class" field, enter the fully qualified name of the class containing the main method
-
Go to the "Dependencies" tab, highlight "Classpath Entries", then click "Advanced...", select "Add External Folder", "OK", and browse to the directory where you copied/created the configuration files earlier
-
Still in the "Dependencies" tab, find the "Add modules" dropdown and select
ALL-MODULE-PATH
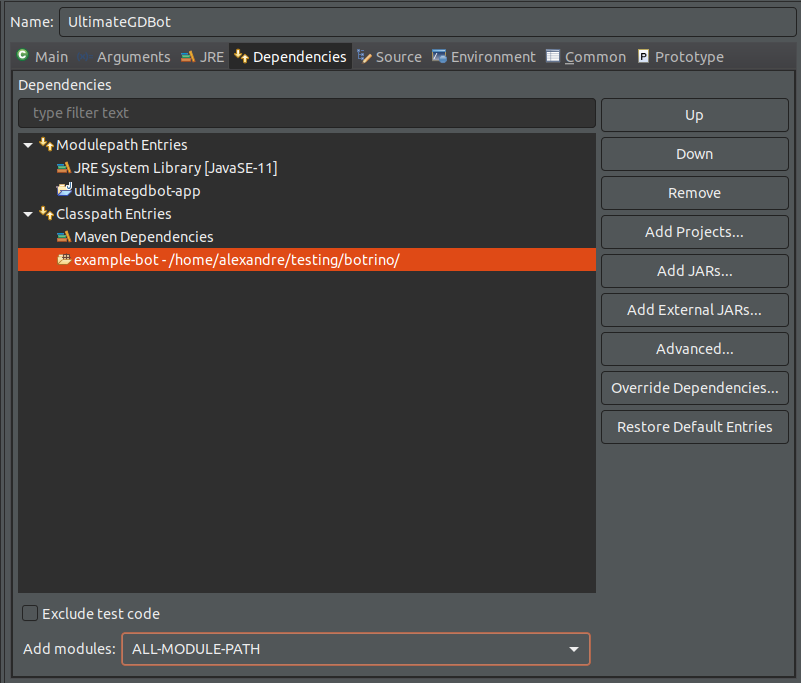
- Click "Apply" then "Run"
In a production environment
If you aren't using the archetype, you would need to configure yourself the packaging for the production environment, including scripts to launch the bot with the correct VM arguments, etc, just like any other Java application. If you are using the archetype, you can build the JLink runtime image with the following command:
mvn package -Dtoken=<BOT_TOKEN>
The bot token property is not required, but saves you from manually editing the json file to insert the token later on.
This command will produce a .zip file found in delivery/target directory. You can unzip it in your production
environment, and just run ./bin/<launcher name>. <launcher name> by default corresponds to the artifactId of your
project.
By default, the application will be attached to the current command line window, meaning the bot would disconnect if you
close the terminal. You can run the application with the --detached flag to launch the bot in the background. You can
combine it with the --batch-mode flag so that it won't ask you to press a key to exit.
Adding system modules to the JLink runtime image
If you build the bot using the JLink runtime image generated by the archetype, the runtime image will include the
minimal set of Java system modules required for a Botrino application to work. If you open the parent pom.xml and find
the maven-jlink-plugin configuration, you can see the following list of system modules:
<addModules>
    <addModule>java.logging</addModule>
    <addModule>jdk.unsupported</addModule>
    <addModule>java.xml</addModule>
    <addModule>java.naming</addModule>
    <addModule>java.desktop</addModule>
    <addModule>jdk.crypto.ec</addModule>
</addModules>
If your application needs another module from the JDK, for example java.sql, all you need to do is to edit this
configuration and add more <addModule> tags.